Suppressor Walk-Off and Lock-Up: Causes, Signs, and Prevention
Suppressors don’t fail at random. When something goes wrong, it usually shows up as one of two issues: suppressor walk-off or suppressor lock-up.
What Is Suppressor Walk-Off?
Suppressor walk-off happens when a suppressor slowly loosens during firing. It’s usually caused by vibration, heat cycling, or a mounting issue that lets the can rotate.
This doesn’t mean the suppressor was installed “wrong.” It means something in the system isn’t holding consistently.
Why Suppressor Walk-Off Happens
Suppressor walk-off is almost always the result of small issues adding up. Common causes include:
- Recoil impulse and vibration – Every shot sends vibration back through the barrel. Without enough resistance, that movement can back threads off.
- Barrel harmonics during extended strings of fire – As the barrel vibrates and heats, it subtly flexes. Those changes affect how tightly the suppressor stays seated.
- Insufficient or inconsistent mounting torque – Hand-tightening varies. If torque isn’t repeatable, retention won’t be either.
- Dirty or worn threads – Carbon, grit, or thread wear reduces surface contact. Less contact means less holding power.
- Environmental factors – Cold conditions shrink metal slightly, and moisture adds slickness. Both can reduce friction where you need it most.
Suppressors rely on friction and alignment. When any of the causes above overwhelm that friction, walk-off starts.
Early Warning Signs of Suppressor Walk-Off
- Subtle point-of-impact shifts.
- Visible rotation or movement.
- Changes in sound, recoil, or feel.
If something feels different, stop and check. Walk-off rarely happens all at once, so watch for the clues.
Fixes for Suppressor Walk-Off
1. Stop firing and verify alignment.
- Engage the safety.
- Let your gun or rifle settle.
- Look closely at where the suppressor meets the barrel.
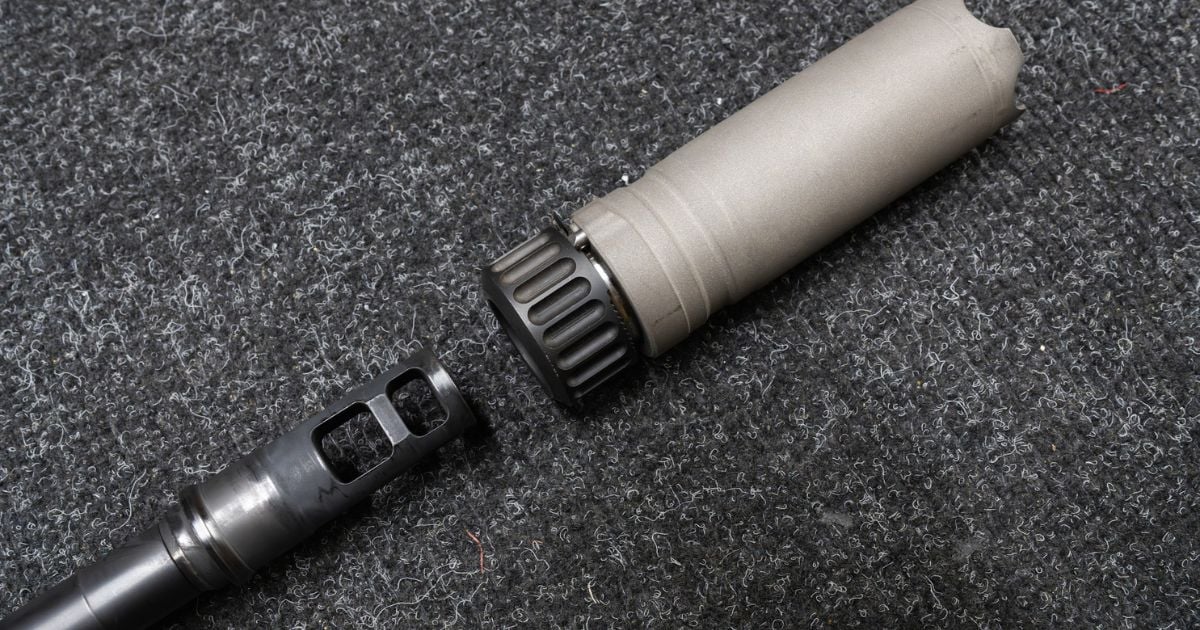
The suppressor should be threaded on until it makes solid, even contact with the flat step behind the threads (the barrel shoulder), or until it is fully seated in its mount.
If you see a gap, uneven seating, or rotation, do not fire another round until it’s corrected. Even minor alignment issues increase the risk of a baffle or end-cap strike (where the bullet hits the inside of the suppressor).
2. Allow controlled cooling if needed.
If the suppressor is extremely hot:
- Set the rifle in a stable position.
- Allow it to cool naturally.
- Avoid dunking it in water or forcing a rapid temperature change.
Hot metal expands. That expansion can mask issues with thread engagement. Controlled cooling allows parts to return closer to their neutral fit before you re-seat the suppressor.
3. Remove, inspect, and re-seat properly.
Once safe to handle:
- Remove the suppressor completely.
- Inspect barrel threads and suppressor threads for carbon, debris, or damage.
- Wipe threads clean if needed.
- Reinstall using consistent, firm hand pressure until it’s fully seated against the shoulder or mount.
What not to rely on: overtightening, improvised thread lockers, or forcing a hot suppressor back into place. Those fixes often create bigger problems later.
Long-Term Prevention of Suppressor Walk-Off
1. Keep threads clean and concentric.
Dirty threads reduce surface contact, which means less friction. Less friction means more rotation under recoil.
- After range sessions, wipe the barrel and suppressor threads.
- Remove carbon before it hardens.
- Inspect for burrs, wear, or uneven contact.
- Confirm the barrel shoulder is flat and clean.
If alignment is questionable, address that first. No retention device fixes poor concentricity.
2. Use the same mounting technique every time.
- Start with clean, dry hands.
- Thread the suppressor on slowly to avoid cross-threading.
- Seat it firmly against the barrel shoulder or fully into the mount.
- Apply the same final hand pressure each time.
3. Apply proper torque without overtightening.
Seat the suppressor until it makes solid contact. Then apply firm, consistent pressure.
- Do not overtighten.
- Do not use tools unless the manufacturer specifies them.
- Do not rely on heat expansion to tighten it later.
Once threads bottom out against the shoulder, extra force doesn’t add security. It only increases wear and raises the chance of future lock-up.
4. Add secondary retention when needed
If you’re running longer strings, higher round counts, or extended precision shooting sessions, light secondary retention can help resist rotation caused by vibration and barrel harmonics.
Examples include:
- Heat-rated retention cords
- Purpose-built anti-rotation accessories
- Mount systems with built-in locking features
These add light resistance to rotation caused by vibration. They do not replace clean threads or proper mounting.
What Is Suppressor Lock-Up?

Suppressor lock-up happens when heat expansion, carbon fouling, or debris causes a suppressor to seize onto the barrel or mount. Instead of loosening during use, the suppressor tightens as it heats, then won’t come off once everything cools.
Why Suppressor Lock-Up Happens
Lock-up usually builds over time, not all at once. Common causes include:
- Carbon and fouling buildup on threads – Carbon acts like grit. As it packs into threads, it increases friction and binds parts together.
- Thermal expansion during firing – Suppressors heat rapidly during firing and retain heat longer than barrels. That expansion tightens the interface while you shoot.
- Cooling while mounted – As everything cools, parts contract unevenly. This can lock threads together.
- Dry threads or improper lubrication – Bare metal-to-bare metal contact increases the risk of galling and seizure.
- Leaving a hot suppressor installed during cooldown – This is one of the most common causes since heat plus fouling plus time equals resistance.
Lock-up isn’t a defect. It’s a predictable result of heat, pressure, and fouling all coming together.
Early Warning Signs of Suppressor Lock-Up
- Increasing resistance during removal.
- Suppressor feels “stuck” after cooling.
- Breakaway torque increases over time.
If the removal effort keeps increasing, address it early since waiting makes lock-up worse.
Fixes for Suppressor Lock-Up
1. Do not force removal.
If it feels stuck:
- Do not grab pliers.
- Do not clamp it in a vise.
- Do not use a sudden, jerking force.
Excess torque will damage barrel threads or deform mounts.
2. Allow controlled temperature equalization.
Heat changes how metal fits together, so if the suppressor is still hot:
- Let it cool gradually in the open air.
- Avoid rapid-cooling methods like water or compressed air.
If it’s already cold and stuck:
- Using gentle, controlled warming (when safe and manufacturer-approved) can help parts expand evenly.
- The goal is slow, even temperature change, not shock.
Metal expands and contracts at different rates. Letting it settle often naturally reduces binding.
3. Use proper tools only when appropriate.
If removal requires tools:
- Follow the suppressor manufacturer’s guidance.
- Use the correct wrench flats or mount-specific tools.
- Apply steady, controlled pressure, and not impact force.
Improvised tools damage finishes, distort tubes, and increase the chance of misalignment later.
4. Know when to stop and wait.
If reasonable hand pressure doesn’t work, stop.
Let the system sit and reassess later. Carbon and heat binding often relax with time. Forcing it rarely improves the situation.
Long-Term Prevention of Suppressor Lock-Up
Preventing lock-up is mostly about maintenance and timing.
1. Perform routine thread cleaning
Carbon buildup acts like an abrasive paste. Over time, it increases friction and binding.
After range sessions:
- Wipe barrel threads.
- Clean suppressor threads.
- Remove carbon before it hardens.
2. Correctly lubricate threads.
Lubrication reduces friction and lowers the risk of galling, but too much attracts fouling.
Use a light, appropriate lubricant designed for high-heat firearm applications.
- Apply sparingly.
- Wipe away excess.
- Avoid heavy grease that traps debris.
3. Remove suppressors while warm (when safe).
Warm threads release more easily than cold ones. When the session ends:
- Allow the suppressor to cool to a safe handling temperature.
- Remove it before full cold contraction sets in.
Do not handle dangerously hot equipment. Safety first. But removing it before complete cooldown reduces seizure risk.
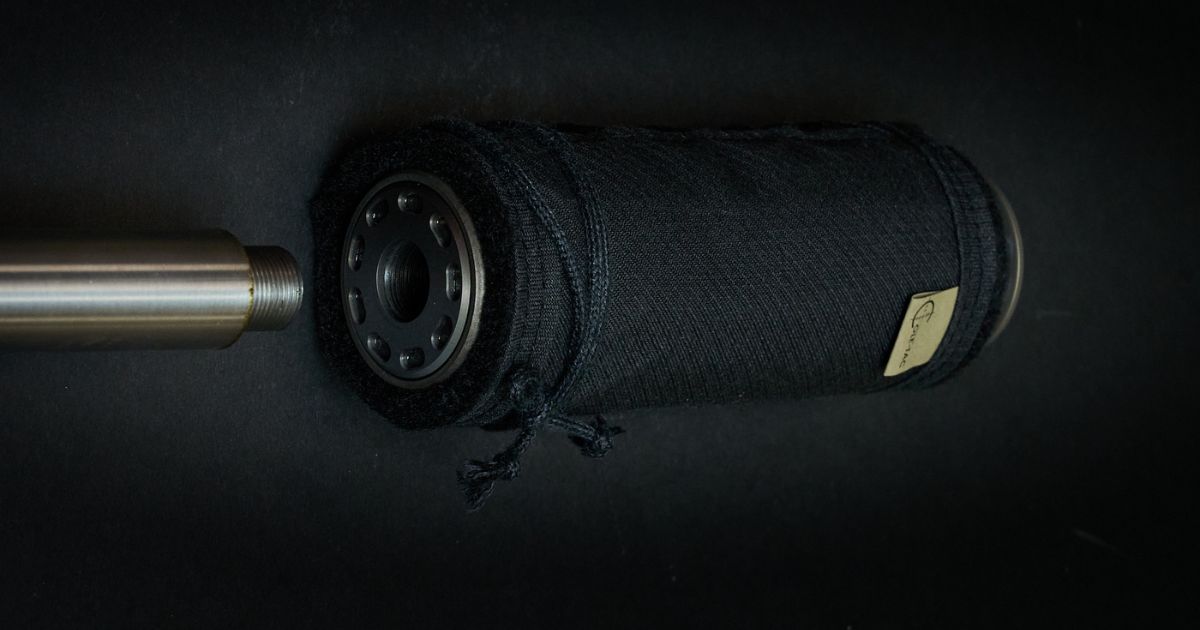
This is where suppressor covers can help.
A properly fitted cover allows safer handling once temperatures drop into a manageable range, and it reduces the risk of accidental burns during post-shoot checks.
Covers like the HTP, Baby Python, and Corset Suppressor Covers from Cole-TAC are designed for sustained heat exposure and give you a safer margin when managing hot equipment.
They don’t prevent lock-up, but they do improve heat management.
4. Manage fouling during high-round sessions.
More rounds equal more carbon and heat. If you’re running extended precision shooting sessions or higher round counts:
- Plan periodic checks.
- Expect increased fouling.
- Clean more frequently.
Lock-up isn’t random. It’s the natural result of heat, carbon, and time.
Consistency Is What Protects Your Suppressor
Suppressor walk-off and lock-up aren’t random problems. They are system behavior under heat, vibration, and fouling. The difference between a minor adjustment and a damaged mount usually comes down to how early you respond and how consistently you maintain your setup.